Saturday, December 29, 2012

Making 3mm terrain modules, Part 2


Once you've got the basic flocking down, you can get creative. If you've got a lot of glue bleeding through your initial flock toos, you can go directly to this step. Otherwise, it's time to lay down more glue. Now you toss on a contrasting flock. In this case, Ive decided to go with a finer, darker flock.
 

I also throw down some coarse flocking and patches of static grass to break up the monotony.
  

 Here's the result of final flocking on two boards. Occasionally, you'll find, after all this work, that one of your boards isn't as straight as you thought it was. Here, I discovered that one of my new modules had a corner that was about 3 millimeters off. You can just ignore this, if you like, and always make sure that the off side is never jutting up to another board. Here, however, I've built a plastic shim to correct the error. I then painted and flocked it. Good as new!

Above you see the final 80cm x 80cm layout of all four modules. Some of the roads need to be completely painted yet, as I discovered that I needed a few extra ones. All I did in these cases was strip out the flocking with a knife, lay down more Vallejo earth paste, paint and re-flock the margins. My two feet will give you some idea of the scale of all this. Suffice it to say that, gamewise, this is the equivalent of a 2 meter by 2 meter table. And it fits in my breakfast nook.

Here you can see two modules close up. The top one has a couple of fields built into it while the muddy area to the left of the river on the bottom one marks the margins of a village. Houses, of course, will be laid down seperately so that they can be moved to accomodate figures during the game. Of course, you could also claim the brown area is muddy ground and hard going, or just ignore it.

Two more modules,  marsh and a defile.


...and, finally a river.

Thursday, December 27, 2012

Completed module next to two blank boards


Here's a quick post to show you what a completed module looks like. This one's sandwiched between two blank frames...


This is a board with a swamp and a hill built into it. The swamp came about as a bit of serendipity. I left it out over night to dry and found, the next morning, that one of our cats had been walking about on it.

After I finished cursing the cat, I noticed that he had pushed up bits in complete rolls. TYhe stuff was still a bit wet, so I took a brush handle and pushed up even more. I then painted it dark, shiny black for water. I flocked the area again with a darker green flock, put in some pushes and some red fall foliage. I mad sure to make a few water areas in the region where my other modules' rivers can connect to. This thing can thus also be dropped into a stretch of river as a marshy bend.

Of course, depending on the scenario, you can call the dark green flocked area marsh, forest or just plain old clear terrain.

The hills, again, are done up wedding cake style in order to clearly show where the elevation lines are.

Terrain Modules for 3mm Black Powder Games: A Tutorial, Part 1

One of the most interesting things about the relatively new microscales (2mm and 3mm) is the fact that they require new ways of thinking about and dealing with terrain on the tabletop. 1/600-1/900 is simply too small a scale for one to use normal terrain modeling approaches: the figures will be drowned out by the background details.

On the upside, no scale is more amenable to terrain module building. A normal terrain module for 15mm or 28mm scale would measure some 3x2 feet at least. In 2/3mm scale, you can easily make (and store) modules that are much, much smaller.

When I first started out with microscales, I went with the old-green-sheet as backdrop and pastels for terrain details route. You can see the results here. Not pretty, but certainly serviceable and with the plus that all the terrain involved can be stored in one toolbox. I still use this method for "away games" when I don't have access to motorized transport. I can pack all the terrain and figures in one big backpack and bike to the game venue.

But I quickly wanted to do beautiful, awe-inspiring terrain like the stuff here. I knew I couldn't get my stuff to equal that, but I wanted to get close. Using 30x30 cm composite wooden squares, then, I did these. These looked nice enough, but quickly warped. Furthermore, they were TOO detailed. In a battle like this one here, the terrain often got in the way of the figures.

So, back to the drawing board...

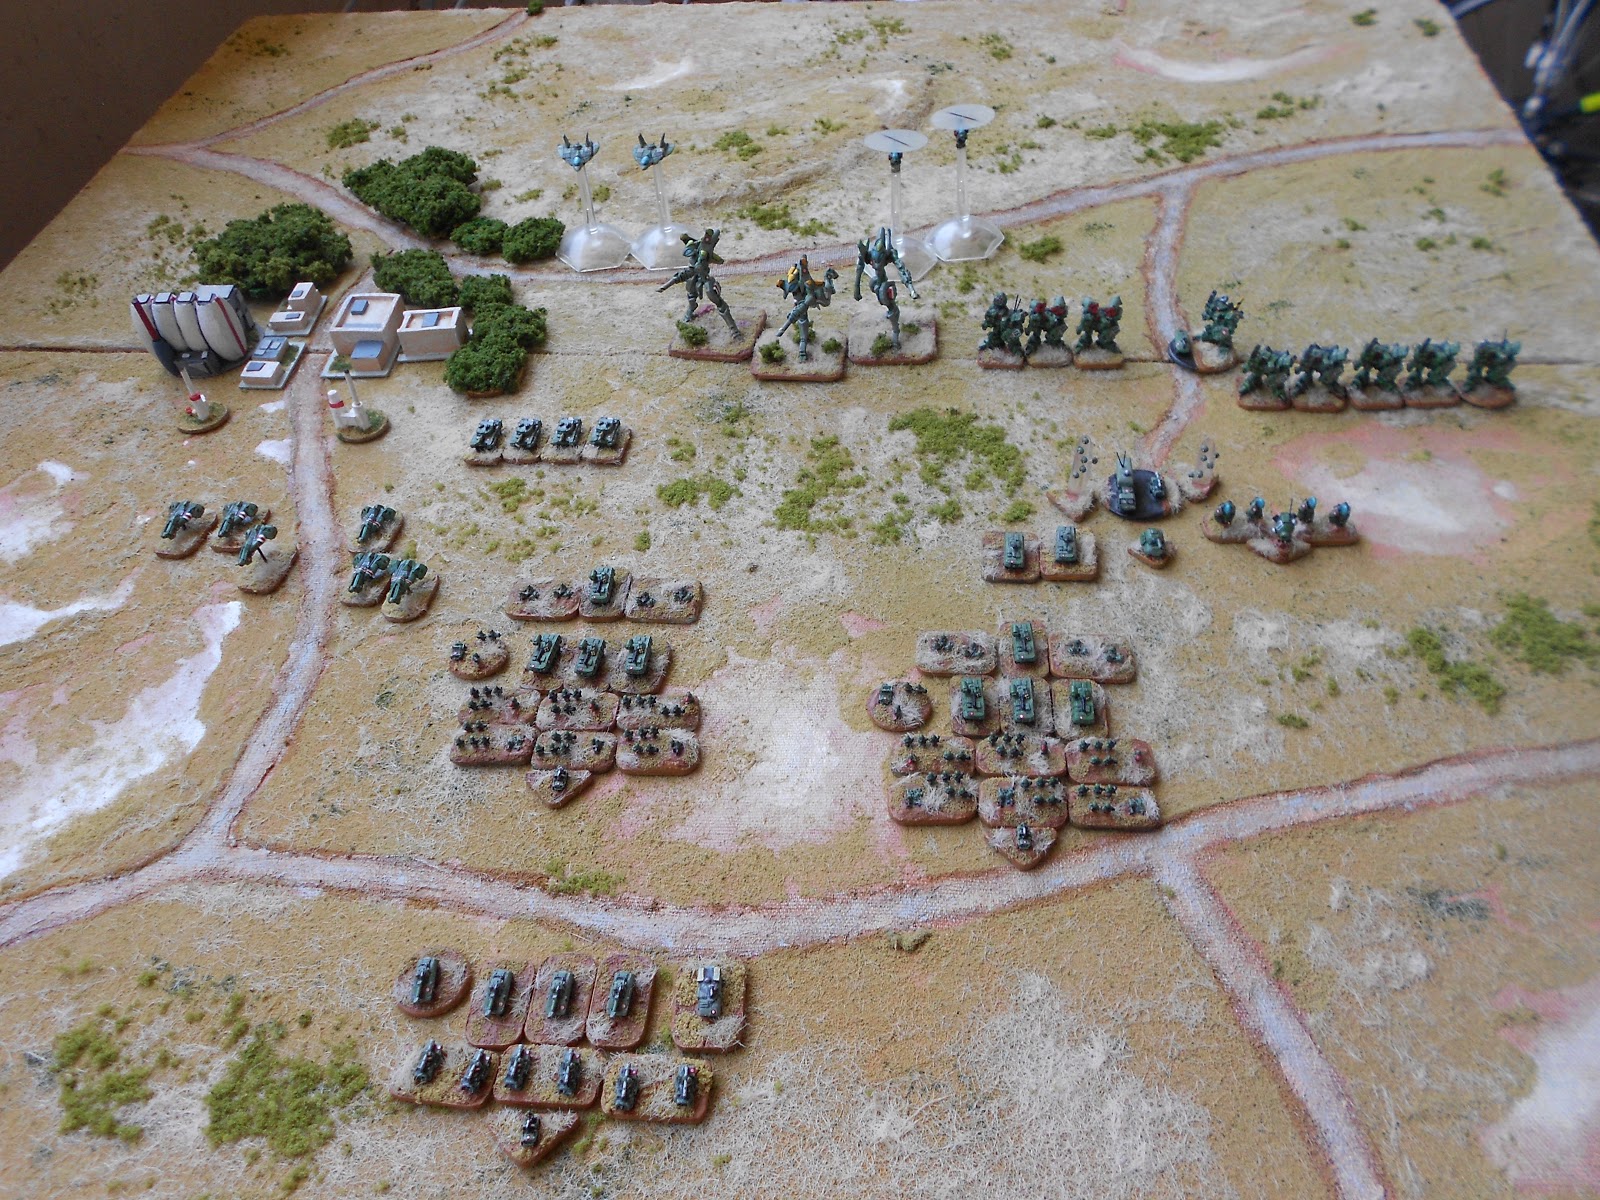
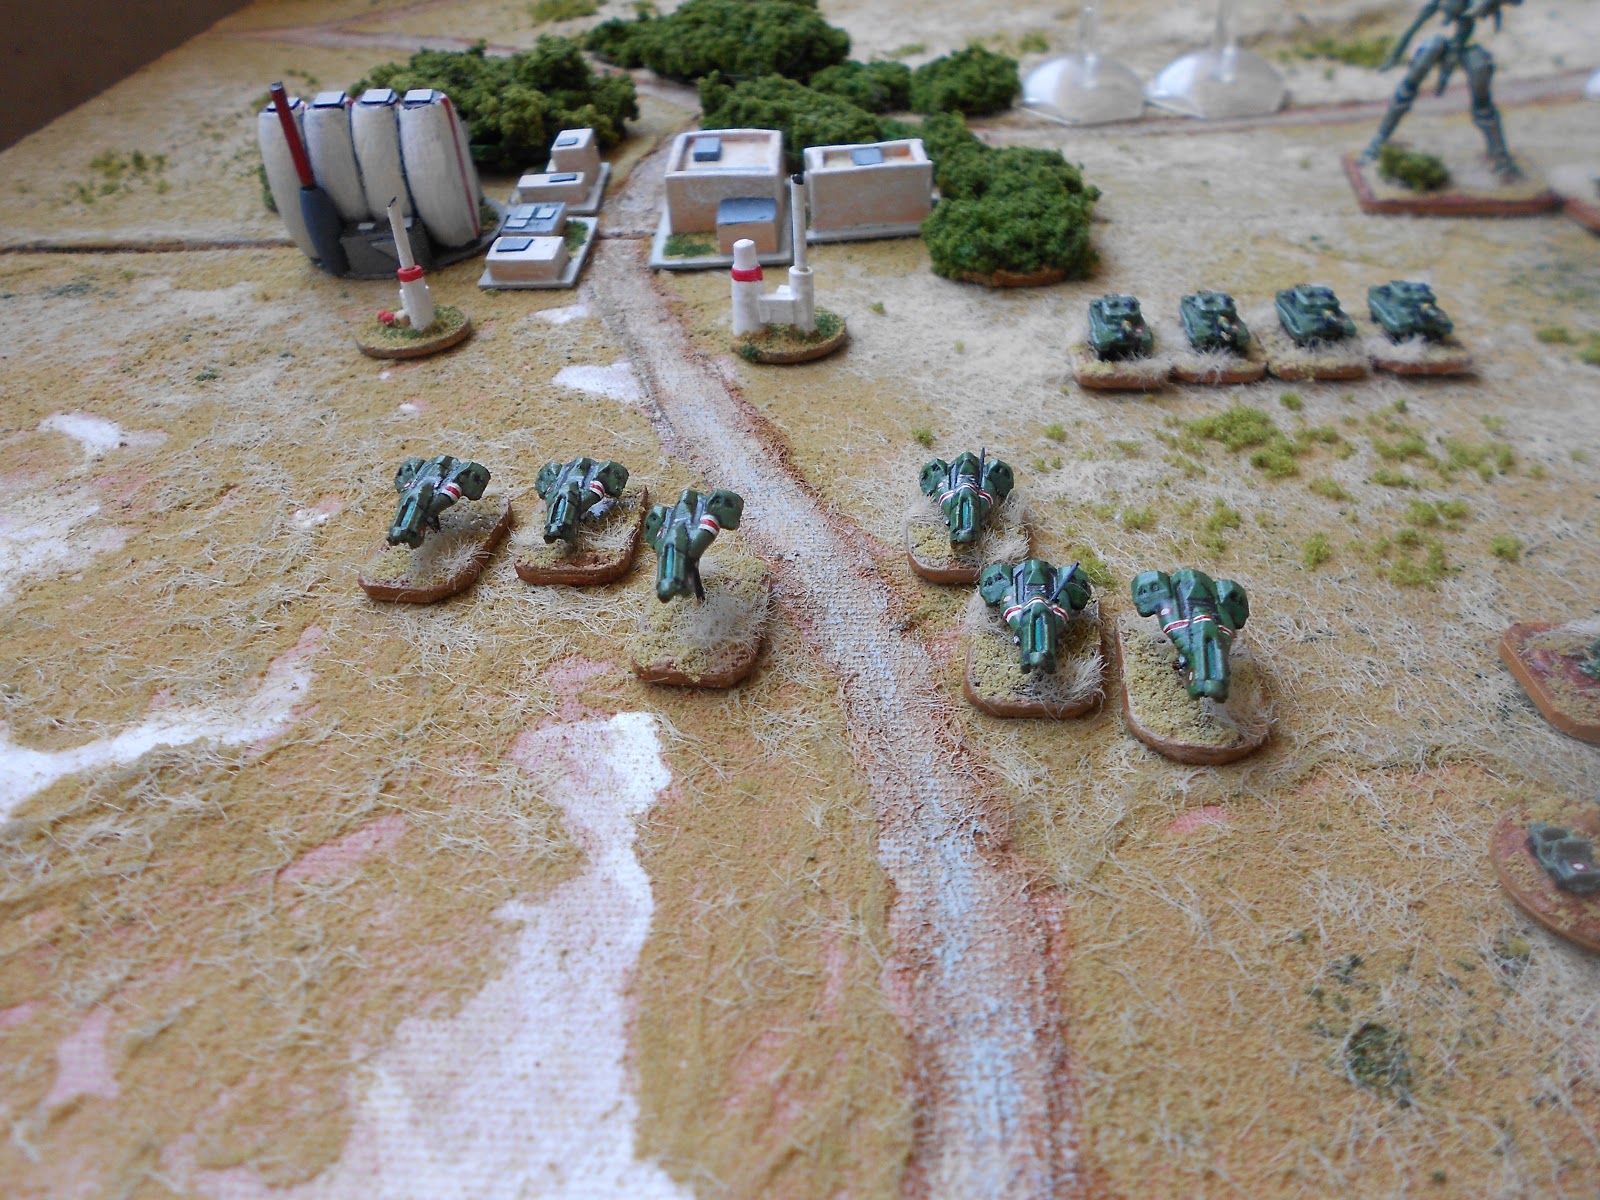
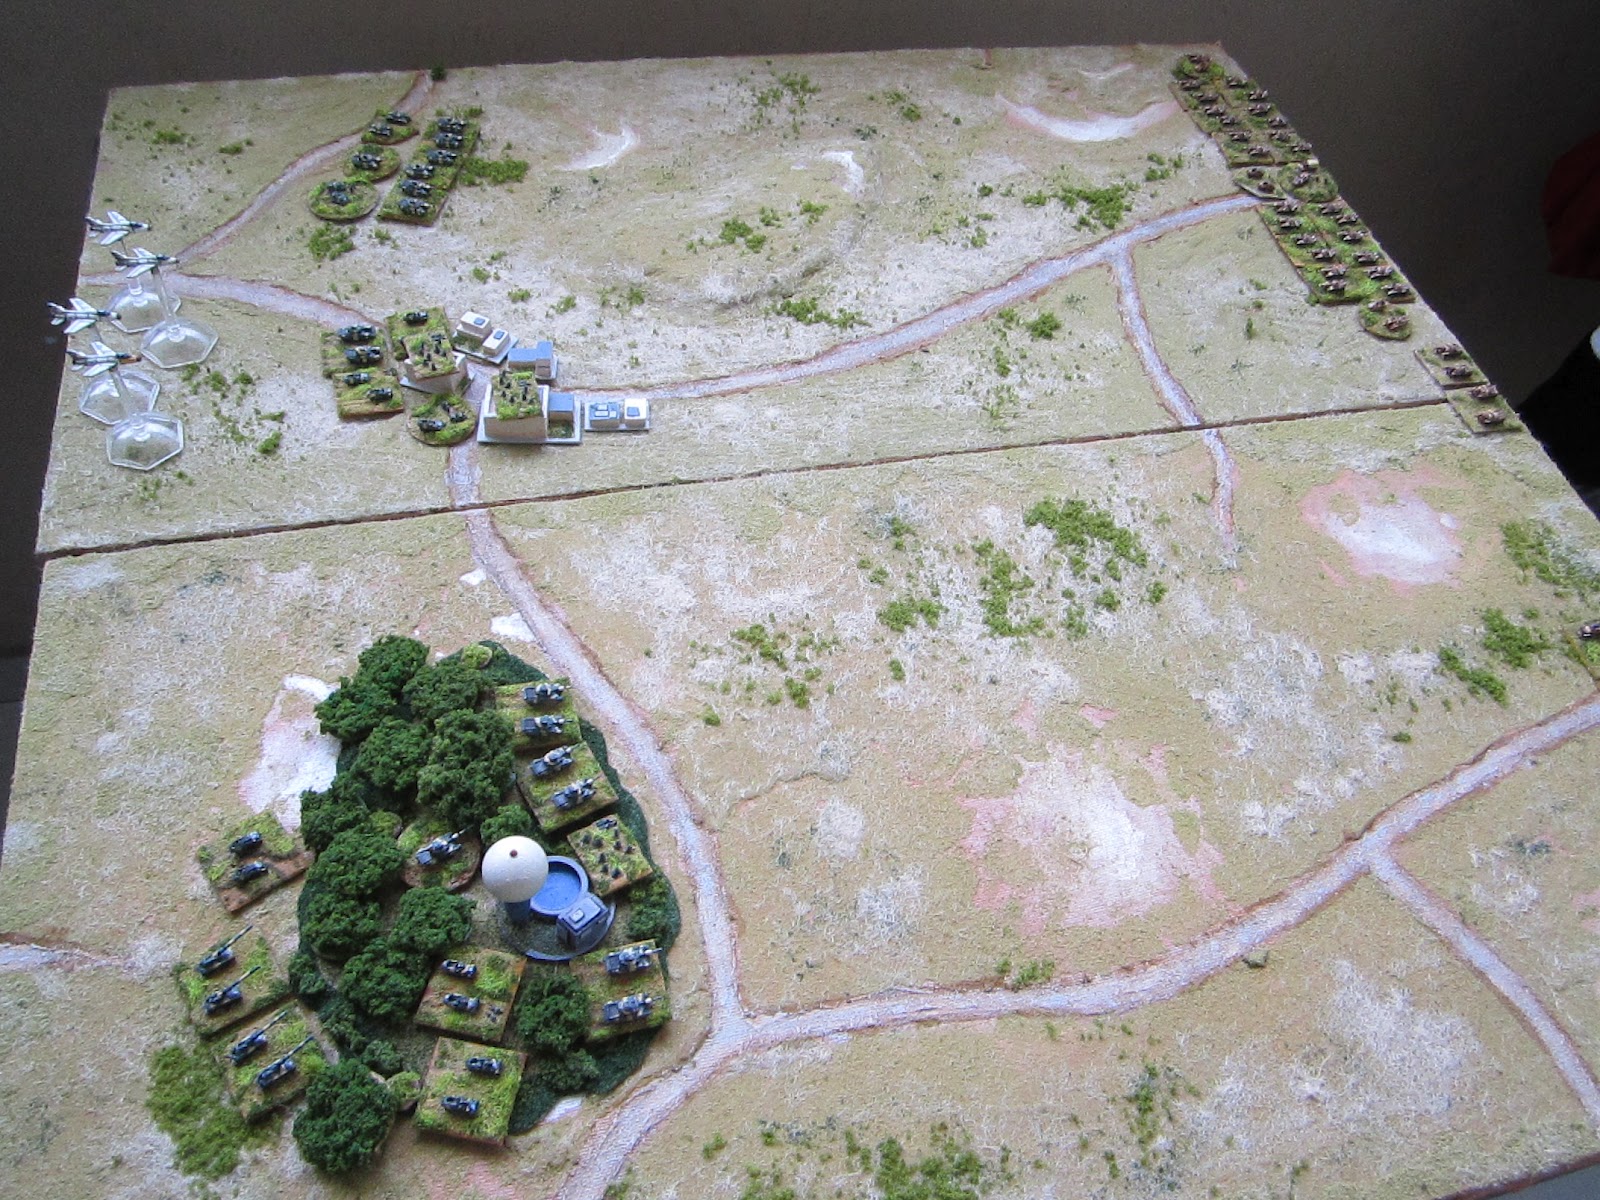
One day, walking through my local art supply store and musing, I ran into some cheap pre-stretched blank canvases on frames that were about 15mm deep and 30x60cm wide and long. I bought a bunch and began to experiment. So far, the results have been really good and you can see my sci-fi desert modules here. After my recent trip to London, however, and my purchase of the Black Powder rules (and a boatload of O8 ACW figures - with Napoleonics on the horizon), I knew I was going to need some 19th-century-ish generic European terrain.

So, to work! I thought I'd document the process so that y'all can learn from it, such as it is, and use or modify the tecniques here to your own satisfaction.

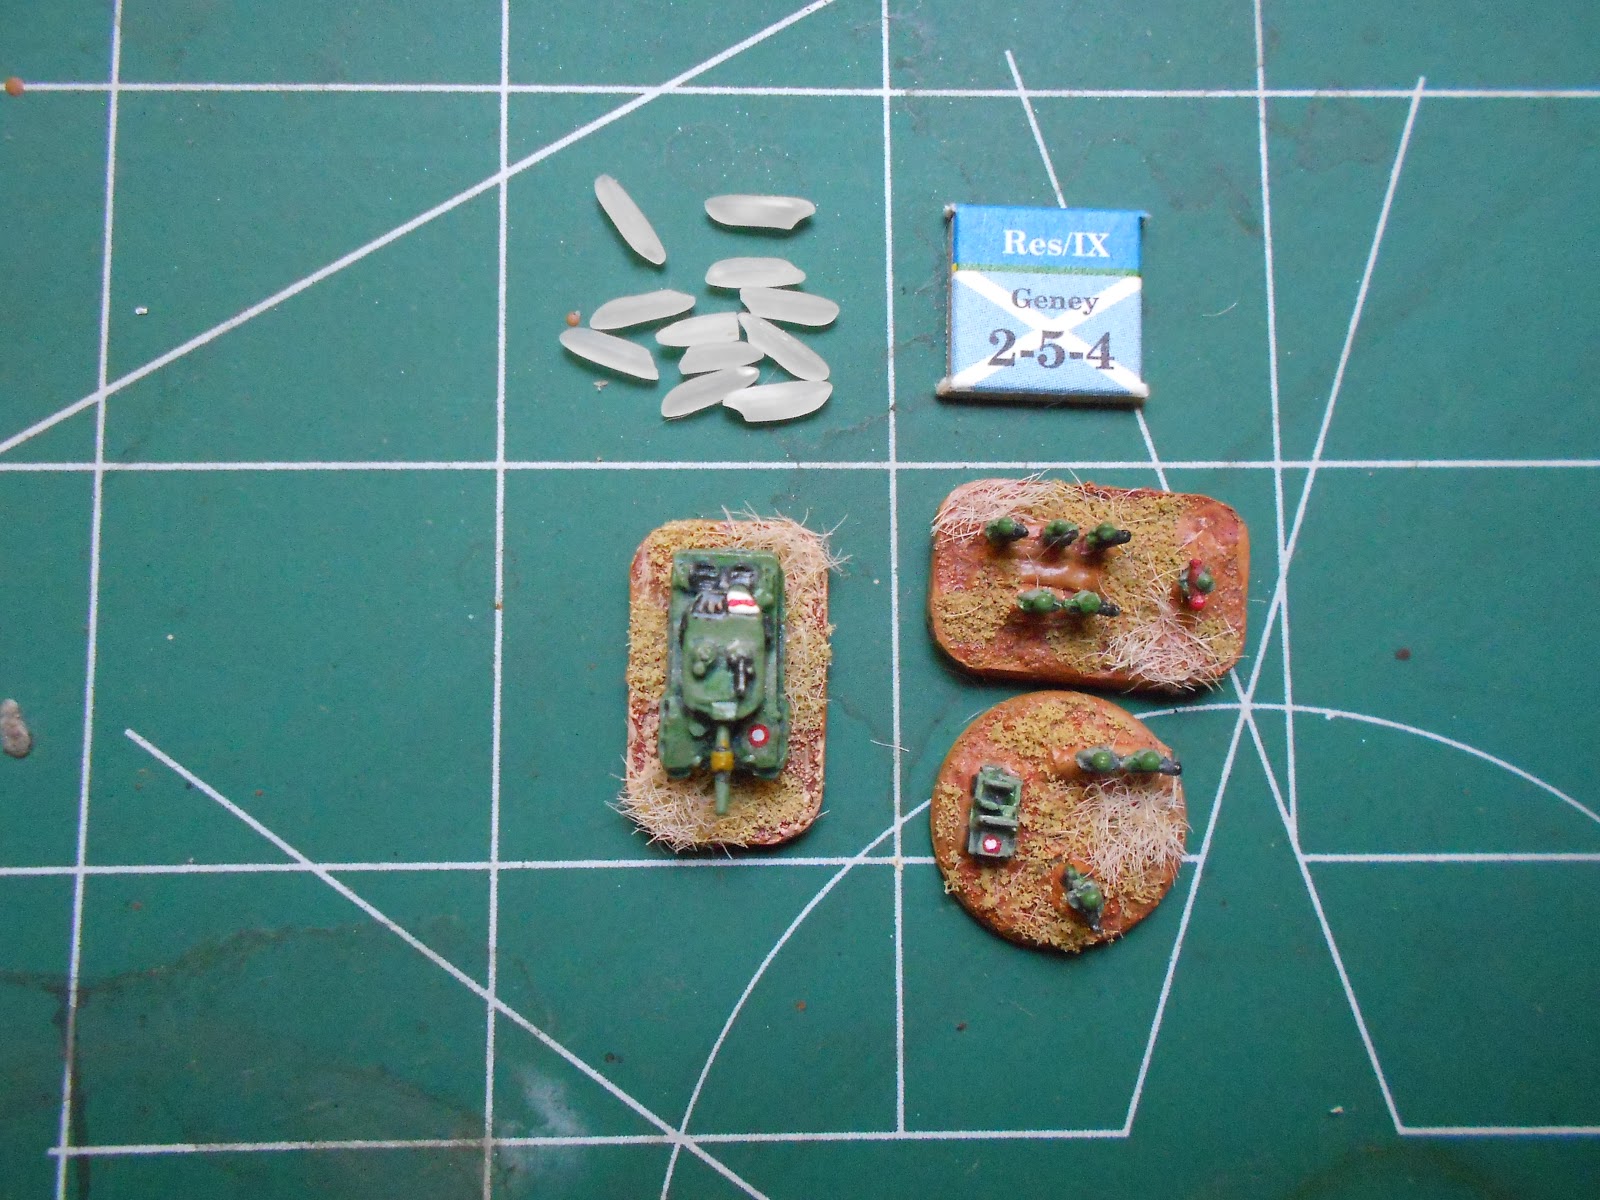
The basic idea is this: cardboard or styrofoam-backed artists' canvases with roads, rivers, hills and a smattering of other terrain, with the rest of the terrain features being pinned in place by map-pins flocked to look like bushes and trees. The pins go right through the canvases and into the underlying foam/cardboard and hold the terrain down. This is important because moveable 2-3mm terrain is very small and light and easily jostled during play. If you pin it in place, however, it stays put until you want or need to take it up.

This system works extremely well and looks great, so I'm very pleased with it so far.

STEP 1: CHOOSE YOUR CANVASES
I recommend 30x60 cm canvases, because this will give you 1x2 foot modules. The ones here are 20x40, however, because when I started the project I couldn't find any in the size I wanted. The ones here are el-cheapo brand, at 5.00 reais (2.50 USD) apiece. I could have bought some pricer ones at 12.00 reais (6.00 USD), but I wanted to keep costs down. I'm not pleased with the look these 20x40 canvases give, however, so I'll probably be doing some 30x60s some time in the future.

There are two considerations you need to keep in mind in Step 1:

1) Make sure the canvases aren't warrped. Line them up one the floor next to each other in various configurations. They won't jut up against each other with no gap at all, but you want to avoid out-and-out abysses.

2) Make sure the canvases are all the same thickness. Try to buy a common thickness here - like 15cm or 3/4th inch - so that you can easily find new canvases for further modules later.


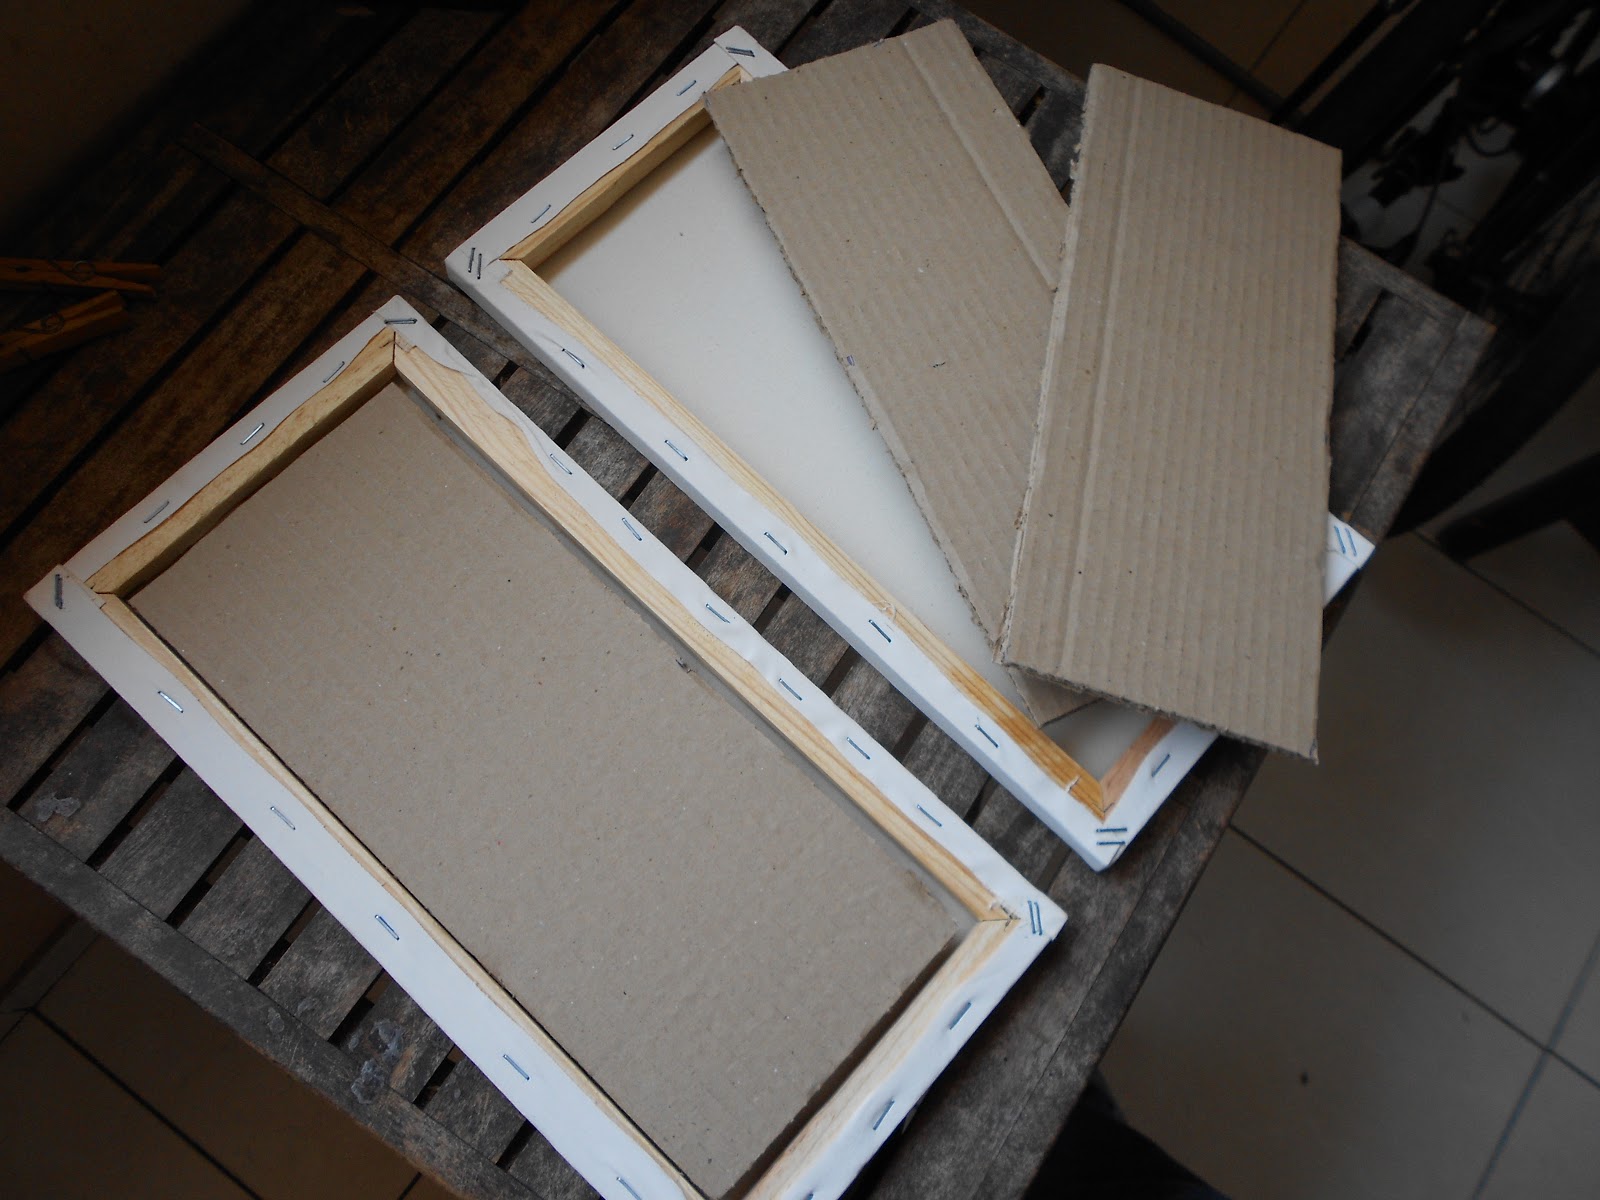
STEP 2: STUFF THE CANVASES
Glue styrofoam or multiple layers of cardboard into the backof the canvas. Seal the back with a piece of cardboard.


STEP 4: LAY DOWN THE HILLS
I use 3mm thick cork, glued down to the canvas. Of course, you could simply make all your hills seperately, so that they can be moved, but I'd rather have the main landforms solidly down on the modules, myself.


STEP 5: DRAW THE ROADS AND RIVERS
Make sure you carefully measure where the roads and rivers come in on each board. Mine all come in 5cm off the corner on the short end and 15cm off the corner on the long end. They are 1cm thick.


STEP 6: PAINT THE ROADS WITH TEXTURE
In this case Vallejo Dark Earth paste.


STEP 7: PAINT THE MODULES GREEN
Including the sides.

STEP 8: PAINT AND DRYBRUSH THE ROADS
This is ironically one of the hardest things. You need to record what paints you use so that you can get your roads to look the same on later modules. I didn't do this between the first and second batches of modules I built, so things look a bit off. Make sure, in this step, to paint the sides of the module where the roads come in the same color as the roads themselves.


STEP 9: FLOCK THAT FUCKER!
First, however, re-mark your roads as they exit the module so you can flock their borders precisely. Brush a thick load of white glue over everything, shake a thick coat of flocking down on top, let stand for a minute, shake the excess flock off onto newspaper and pour it back into your flocking jar. The big thing here is to not let the glue drip down the module's side or get on the roads. If you mess up. take a wet brush and push the flocking off the roads and sides before it dries


You could let the flock soak up glue for several minutes if you want. To me, however, that's a waste given the next two steps. I just wait a minute, shake it off and let everything dry. Note: do not do this where the wind or a fan can reach you, unless you want a very pissed-off significant other hacking up green foam for the rest of the weekend...


Wednesday, December 26, 2012

What do 3mm figures REALLY look like?

3mm is something of a maligned scale. If you say you collect, paint and play it, sooner or later some "funny" guy will make a crack about how you can't tell the figures from a grain of rice or a wargames counter.

Haha. Funny and original. These guys....!

Well, here's a couple of comparison shots to show what 3mm really look like. Are they small? Yes. Are they indistinguishable from rice or wargames counters? Only if you're blind and an idiot to boot.

This is rice...


This is rice and a wargames counter...


This is rice, a wargames counter, and O8 3mm figures.


Another angle, showing height.


Are 3mm figures as visually impressive as 28mm figures?

Individually, no. Your entire setup, taken as a whole, however, can look just awesome.

Should you care if the figs aren't as individually impressive as larger figures, however?

Right now, I'm getting set to buy two complete Napoleonic armies for Black Powder / LaSalle. They will each contain something on the order of 30 battalions and the whole set up will cost me around 200 USD. The armies can be played on my coffee table - a 2 ft x 3 ft expanse - with plenty of room for manuever. They can be stored in cigar boxes. And the game looks just fine.

I'm not a middle-aged American man living in a suburb. I live in an apartment in Rio de Janeiro. Space is tight. Money is tighter. 3mm allows me to play beautiful-looking, epic battles on a budget and store everything (including paints, terrain modules, and flocking) in a single bookshelf unit.
 
So are they harder to paint?

No.

I'm 45 and my eyes are going. Still, by using basic wash and drybrush techniques, I can paint an army to a table standard in the space of an hour or two. By spending half the ammount of time I would use on 15mm figs, I can do much better than that, as these figs are incredibly detailed for their size. And sure, while getting some of the small details can be a pain, so can painting the belt buckles on your 15mm knights.

One final advantage to 3mm: it allows you to collect armies and periods you'd otherwise ignore. As I mentioned above, I'm now diving into Napoleonics, a period I'd avoided so far in my miniatures collecting life due to costs and complexity. 3mm, however, lets me play large games at low cost and with a very small storage footprint.

Finally, it should be mentioned that O8's 3mm stuff is an order of magnitude beyond Irregular's 2mm stuff. Not only does the extra millimeter allow for much more detail, O8's sculptors are simply much better than Irregular's.

I urge you to give O8's 3mm figures a try! Use them to do a periopd or army you've always wanted to dabble in, but couldn't afford. You'll be surprised at how beautiful and functional this scale is!

Monday, December 24, 2012

NVL reinforcements arrive on Smade's World.

I really wanted to have these guys done by Xmas, but I'm only 2/3rds of the way there. Still, that's better than nothing. So, without further ado, here's what the New Vistula Legion presence on Smade's World looks like so far...

The entire force, laid out in parade order outside of the village of Crappensburg.

Most of the armor and infantry is 3mm stuff from 08.


 The regimental command echelon and most of the support companies. To the left we have the heavy mortar battery, to the right the walker platoon, with hunter-killer drones attached. To the either side of the Regimental H.Q. we can see the rest of the drone company: two recon swarms.
 

Here's a close-in picture of the drone company: two recon swarms and a  hunter-killer swarm. About half of the drone company still needs to be uncrated and activated.


One  of the two Legionary motorized infantry companies already on-planet. We're currently awaiting the third. This is three platoons of infantry, a medium mortar battery and a jeep-mounted recon section, plus headquarters.


The light attack company. Unfortunately, the photo's a bit blurred. Three platoons made up of a mix of armored cars and Fast Attack Buggies, along with a medium mortar section, headquarters and jeep-mounted recon.


An armored regiment from the Second Mechanized Brigade (Regular Army) is inbound and expected in the next two weeks. This is it's first squadron: four troops of heavy tanks.


The 24th Uhlans have had some shipping problems and only one of their line squadrons has made planetfall. The regiment's command echelon and its heavy support company have managed to join Squadron A on Smade's World, however.

The figures are fleet-scale Earth Battle Frames from Dream Pod 9.
 

 Two squadrons from a Fast Attack regiment have also made planetfall. Here we see them moving out from Crappenburg in front of the heavy armor. Until their command echelon disembarks, however, these 'speeders will be relegated to an infantry support role.


Close up photos of the 'speeders with MBT for comparison. The 'speeders are Harrier Class Gunships from Arbon Engineering, sold on Shapeways, done up in white detail material. As you can see, they scale well next to the MBTs and look like a fast GEV or landspeeder-like attack craft.


The 3rd Heavy Assault Regiment is made up of three "Spectre" class titans, nicknamed "the three graces". From left to right they are Maryla, Gabrjela and Serafina. They are made to order for the Neo-Poles by the Siliaz aliens and use black-box technology that's far beyond anything the human sphere can produce.

The figures are actually modified Dakini tecbots from the 28mm skirmish game, "Infinity".

 
A slightly out-of-focus shot of Serafina.

Sunday, August 5, 2012

3mm Confederate ACW Regiments for Black Powder

On our recent trip to England, I managed to pick up a copy of Black Powder, the Perry Brothers' excellent and well-produced rules set for 18th-19th century miniatures warfare. Black Powder uses the same basic engine as Blitzkrieg/Cold War/Future War Commander in that it's a mutation of Games' Workshop's old Warmaster system. I thus thought it'd be a great game to get as it would allow the folks I play with to learn one basic rules system for combat from 1700 to 2100.

Back in Rio, I set about re-basing my O8 3mm American Civil War armies for the new rules. Here's the first two Confederate States regiments on a recently built terrain module:


Black Powder units are regiments or battalions and can be based to any size you like, depending on what your collection holds. All you really need are enough stands to reasonably portray the five basic unit formations: line, column, assault column, square and skirmish. Using 28mm figures (which is the scale the Perry Bros prefer, being independently wealthy and owners of a huge, private gaming room), this means 24-36 figures, based two b y two on 40mm x 40mm stands.

Being that I am an apartment dweller and independently impoverished, I play in 3mm. I've thus decided to base my Black Powder regiments on four 20mm x 20mm stands. Four is enough to attractively model the four principle formations and I have a bunch of skirmisher stands painted up for when the regiments break down into the fifth formation.

Each stand contains two O8 infantry strips, which makes each regiment cost about USD 1.75. I plan on building 12 infantry regiments, 2 cavalry regiments and 3 artillery batteries for both the Confederate and Union armies, which means that the entire ACW project, including houses and fences (also bought from O8), will be brought in at under 100 USD.

I've also provided each regiment with a separately-based colonel because I plan to port the leader rules from the old Battles and Leaders boardgame to Black Powder.

Cavalry and artillery will be based differently, of course. Each cavalry unit will be a half-regiment of four stands, accompanied by 4 dismounted skirmisher stands. This will give the cavalry the proper on-table foot-print as compared to infantry. Union batteries will be three 30mm x 30mm stands and accompanying limbers, each stand with two cannons. Confederate batteries will be two similarly-sized stands.

When O8 comes out with its Napoleonics line later this year, I'll probably go with six stand units as it will allow me to make each stand a French Line company. Even so, this means my Napoleonics game will take up half the footprint of one of the Perry's 28mm games. I'll probably simply reduce inches to centimeters and play that way.

For the ACW, however, I can cut all ranges by 1/4th if I like, given that my regiments are 1/4th as large as the Perry's suggested 32 figure regiments in 28mm.

Again, this shows off the two great benefits of 3mm gaming: cost and space. There is no way I'd ever take up ACW gaming if I had to play in 28mm - or even 10mm, for that matter. But at 3mm, it's a small project that costs very little and can be played on a coffee table. And while it's not as visually impressive as 28mm, by a long shot, I think the above photo quite clearly shows that we're not dealing with "grains of rice" or "counters", as many 3mm haters often charge.

Saturday, May 19, 2012

Commander series company level rules


 One of the joys of the Commander system is its maravelous flexibility. Recently, I've been playing at company level, where each unit represents 10-15 vehicles and 100-200 men. This is what I've discovered needs to be done to adapt the rules to that level:

1) Divide all measurements by ten: this is the new range, move etc. in inches. Each inch represents around 250 meters.

2) To make things easier, I base my vehicle stands at 1x1 inch and the infantry at 1x 1/2 inch.

3) The basic increment for command range is 4 inches.

4) FAO and FAA are presumed to be in the CO and HQ stands themselves. Add 1/2 the value of the FAO and/or FAA to the cost of these stands if they have them attached.

5) For Artillery and Air Strike purposes, spotting can be traced from any unit within one command increment (4 inches)of a FAO/FAA equipped HQ or CO.

6) Artillery and airstrike drift dice totals are divided by five and rounded up. This is the number of half-inches they drift.

7) Command can be measured to congruent groups (adjacent stands) by tracing it to the closest unit.

8) Artillery and air strike aim points are the center of their respective targets. A unit is only hit by an artillery or air strike if the template covers its center.

Here's some eye-candy from yesterday's game. Here, a Krasnynorad Tank division takes on a mixed Azurnerreich task force in an assault scenario. I let the game run 10 turns, due to the map being so big (a 2ft by 2ft map in company scale is the equivalent of a 2.4m x 2.4m map at regular scale), but by turn 8, it was obvious that Big Red wasn't going to take the prime terrain objective (i.e. the village), in spitee of shattering most of Great Blue's armor.


The game at start: Blue occupies the woods, the village and is poised to put most of its armor on the ridge. To the east, Red masses two tank and a motor infantry regiment.


I'm very proud of this terrain feature. It's a piece of cloth, glued to plastic with silicon caulking, then painted and flocked with more silicon caulking. Finally, bunches of flocked bases are placed on top (along with the water tower), to illustrate woods terrain.


Here's the village: Red needed to ocupy this by turn 10 for the win. Blue has placed the better part of an infantry battalion here, along with a close-support company of Centurions.


The situation at the end of Turn 5. Red has engaged all along the front of the ridgeline, bringing on a third tank regiment from the right flank. All of Blue's armor has rushed to meet the attack and is in danger, now, of being flanked.


Turn 7, the turning point. This airstrike saved the day for Great Blue. A squadron of F-100 Super Sabres bombs Red's flanking regiment, following a devastating artillery barrage. This attack killed half a battalion of armor and disrupted the only in-range HQ. The next turn, the Red CO rolled an "11" right off the bat, attempting to move the whole division in for the kill. A short range knife fight then developed to the right of the ridge, with Blue's Centurions taking out an entire regiment of T-54s while the rest of the division sorted out its command problems in the confusion following the airstrike.

 End game, beginning of Red Turn 8. Blues' armor is almost spent and another company will be destroyed this turn. However, Red has little chance of getting enough infantry into the village before Turn 10 to win the game. When the Red CO blew yet ANOTHER command roll on his first attempt to activate, Red threw in the towel.


Tuesday, May 1, 2012

More 3mm NVL Photos


Here are a few more photos of my new 3mm New Vistula Legion troops, trying out my second Smade's World terrain module.

The Light Attack company and Scout company of the First Regiment scope out a crossroads.
A squadron from the 24th Uhlans backs up the Light Attack company.
Drones lead a mounted Light Mechanized Infantry company down the road. The commander watches from the side.
Task force of the 1st Regiment, New Vistula Legion
The last photo gives you a pretty good glimpse of the terrain module.


This is built on a 60x30cm framed artist's canvas with a styrofoam backing board glued in underneath. This particular board is a plains board, with only one small hill in the center, just to the right of the helicopters.

I now have three Smade's World boards done and a fourth coming up. Hopefully, I'll get a tutorial done before too long!

Sunday, April 22, 2012

Company A, First Regiment, New Vistual Legion Deploys


Well, here's Company A of the First Regiment of the New Vistula Legion, deployed on Smade's World. You see them here with a squadron of the 24th Uhlans, along with the attack component of the regimental air company and a flight of ground support aerospace attack craft.

(Also in the pictures, one can see my first terrain module done up especially for Smade's World. It's based on a 60cm x 30cm pre-framed painter's canvas, with expansion-foam hills and scratch-built buildings. These terrain modules will be the subject of a future post when I get a couple more of them made.)

These troops are 3mm modern and sci-fi figures from a variety of manufacturers, based for playing Future War Commander at platoon scale. FWC players will wonder why each platoon has two stands instead of the one which is the norm for platooon scale. This is due to the fact that the NVLs platoons are heavily over-manned by Human Sphere standards. Most infantry squads have 6-8 ground soldiers, for example, while the NVL's have 12. Likewise, NVL's vehicular platoons contain 5 vehicles instead of the normal 3, while its artillery batteries have 6 btubes instead of 4.

These large units allow the NVL to deploy a combat-capable force off-world for extended periods of time without replacements.


Here's the company, deployed to defend a ridge. The Wolverine II wheeled APCs are stationed behind the ridge, able to offer smart missile support via the target designators mounted in the company's recon drones (seen atop the ridge, left of center).

Alongside the APCs are the 6 tubes of the company's mortar battery. All the troops in this photo come from Oddzial Osmy via Pico Armor in the U.S. The foot soldiers are modern Soviet infantry and the APCs are Polish Rosomak APCs. I added a smart missile launcher to the Rosomak's turret with a bit of PVC tubing I had lying about. The drone, of course, is hand made.


Here's a close-up view of the center of the company's position. Each stand represents about 25 men in 3mm scale and two stands make up a platoon. This shot also shows you the recon drone, with the Wolverine IIs far in the background.


A close-up of the Wolverine II, drone and infantry. As I mentioned above, the APC has been customized by the addition of a smart missile launcher, seen here to the left of its turret.


Here is half the Regiment's air company (the other half is made up of heavy transport helicopters). Yes, I see the little fuzzies stuck to the bottom of those rotor disks. A couple of years ago, O8 moved to  "stick-on" rotors and the residual glue attracts dust. I'm going to need to clean them with a cue-tip. Would alchohol work, though? I don't want to use acetone for fear of desolving the rotors themselves.


The NVL is organized as a light, star-mobile force and thus has no organic heavy armor resources. AFVs are limited to the Wolverine IIs and the armored cars of the Light Attack company (not pictured here - one vehicle still needs to be painted up). Each regiment does have a heavy power armor platoon attached to its headquarters company, however. This can be seen in the picture above.

These figures are 6mm Scotia Power Armor troopers, regonfigured here to be 5 meter tall infantry support walkers.


When circumstances permit, the NVL deploys with units cross-attached from regular military formations. Here we see a squadron of the 24th Uhlans Mecha Regiment holding the infantry company's flank. It is made up of three line troops, a heavy support troop and a headquarters troop (farthest back, on a round base).

The figures here are from Dream Pod 9's "Fleet Scale" line and are Terran Gears (which, unfortunately, don't seem to be available anymore). This figure has a problem in that the barrel of its rifle (the silver bit on the left side of the figure here) is too thin and often snaps off. I "fixed" that by making the support and command mecha carry "carbines". The support mech has a bit attached to its shoulder from a Games Workshop Tau pack. If I ever do the entire 24th Regiment, this unit will probably be remounted as the regimental commander, as I only have the one bit. I'll have to come up with a different solution for the support troops. The command mecha is kitbashed by having an EW dome (a small bead, actually) glued to its right shoulder.


Finally, here's a flight from the attached 8th Tactical Aviation squadron, making a recon run ahead of the task force's position. These are Slayer micro-fighters from Iron Wind Metals. They scale perfectly to 1/600.


So that's it so far. I have most of the Light Attack company and the other two Light Mechanized Infantry companies painted, as well as the supporting units, but I need to kit-bash more drones and a few more mortar vehicles. Hopefully I'll have all of this up soon!

.