Sunday, February 27, 2011

Where, oh, where are my O8 ACW figs?

Only Larry can understand my pain...


(Not complaining about the stellar service from the folks at Pico Armor, mind you. This is almost certainly a fuck-up that's meide im Brasil.)

Tuesday, February 8, 2011

Basing Suggestions for O8's 3mm ACW Figures

The excellent "Steel on Sand" blog has beat me to reviewing O8's beautiful  3mm American Civil War figures. I'm still awaiting my order in Rio de Janeiro, but you can see them laid out in comparison to other microscale figures over there.

The one problem with these figs, as the SoS review points out, is that the command stand has its flags offset from the center. This isn't an issue if you base your figs on 40mm or 60mm wide bases, but if you, like me, base microscale on 20-30mm wide bases, having the flags removed from the center of the line might irritate your anal retentiveness.

To complicate things, O8 uses an aluminum-based alloy which is incredibly strong, but brittle, making it very hard to cut. Also, the infantry bases are not "pre-grooved", which would allow one to snap them into component figures with ease. I thus plan on using a Dremel tool with a cutting wheel to chop mine up. Still, no sense in making more cuts than one needs, neh?

With that in mind, I offer the following basing schemes for O8's ACW figures:


Note that by cutting the strips up, one can easily change the mix of headgear in the regiment, giving the Union more kepis and fewer hats and the Confederates the opposite. Personally, I think I'm going to go with the last option. I've displayed it here showing only the Good Guys, but obviously a Slaveocrat regiment can also be done up in this fashion. The advantage of this way of doing things is that it allows one to play at the tactical scale (150 men per stand) and move the commander and standards about as the number of units in the regiment increases or decreases. Additionally, it saves on skirmishers, who are now properly detatched from the main line and don't need to be represented twice. Also, with a 3x3 centimeter sabot, one can set up a brigade, as shown, and handily play Volley & Bayonet or other army-level systems.

One final basing idea, not shown above, gets rid of another small problem with the O8 figs at the cost of a lot of extra work. ACW units marched at 24 inches per file, but O8 has the troops at about 30 inches per file. If one were to seperately cut out every figure, one could probably get a historically correct spacing (with the cut taking out the excess metal) and could place 15 files on a 30cm wide base. With a Dremel, such cutting won't be a problem. The real chore would be hiding all the jagged edges and gaps when flocking.

I'm probably going to try one or two regiments like this (as well as another couple of regiments using skirmish figures) just to see how it looks, but it seems like too much work for it to be worth doing it for all the units.

Wednesday, February 2, 2011

Encounter at Ravelsbach, Part Two

A Napoleonic Volley & Bayonet Battle in 1/900 Scale, part 2.

Napoleon pulls cards #3 and #13 as his deployment options.


Advance Guard would allow Napoleon to concentrate his forces on the left flank while conducting a holding action in the congested right flank. However, Card #13 allows this manuever with more security, given that the French right wing consists solely of poorly trained infantry, which would find it difficult to manuever in the woods and villages of the right flank.

Napoleon thus chooses Card #3, Advance Guard, Echelon Right. He will set up all his units on the board, but remove the right wing at the end of turn 1 and bring it in on the left wing on turn 4.

Ironically, the Austrians pull cards #22 and #23, which are both Turning Maneuver, Right. #22is marginally better, so that gets chosen. The Austrians deploy everything on the table and will remove the reserve and bring it in on right edge of the table (the French left flank) on turn 3. The Austrians figure that this will allow the French to either advance into a trap or have their defensive line quickly rolled up by an unexpected cavalry charge.

Here are the deployments, then:


Napoleon is betting all his chips on a concerted push up the left flank, crushing the Austrian right and rolling up the battleline from there. A couple of III Corps brigade will attempt to hold out as long as possible in the villages and forests of the right flank while Le Grande ArmeƩ wins it for the team on the right.

By contrast, the Austrians will drive up through the middle and try to break the French middle. This will be aided by a surprise strike from the right on turn 3. With the deployment complete, the Austrian is happy he chose Deployment card #22 and not #23, which would have called for the reserve to be committed on turn 3. The Austrian player feels that three turns will be more than enough for the French to get well stuck in before the surprise blow falls.

Encounter at Ravelsbach, Part One

A Napoleonic Volley & Bayonet Battle in 1/900 Scale.

In order to try out my new battleboards, I decided to put together a small (+/- 3000 points per side) battle using the new second edition of the Volley & Bayonet rules.

My 2mm armies are not completely formated for V&B 2nd Ed. yet, but I have a lot of them and, with a bit of hedging, I can use them with the new rules.

This battle was a "roll your own" affair using the campaign system represented in the book. It takes place somewhere in northern Austria in 1813. Napoleon at the head of two infantry and one cavalry corps and backed up by a division of Middle Guards runs smack into two Austrian infantry corps and assorted support units.

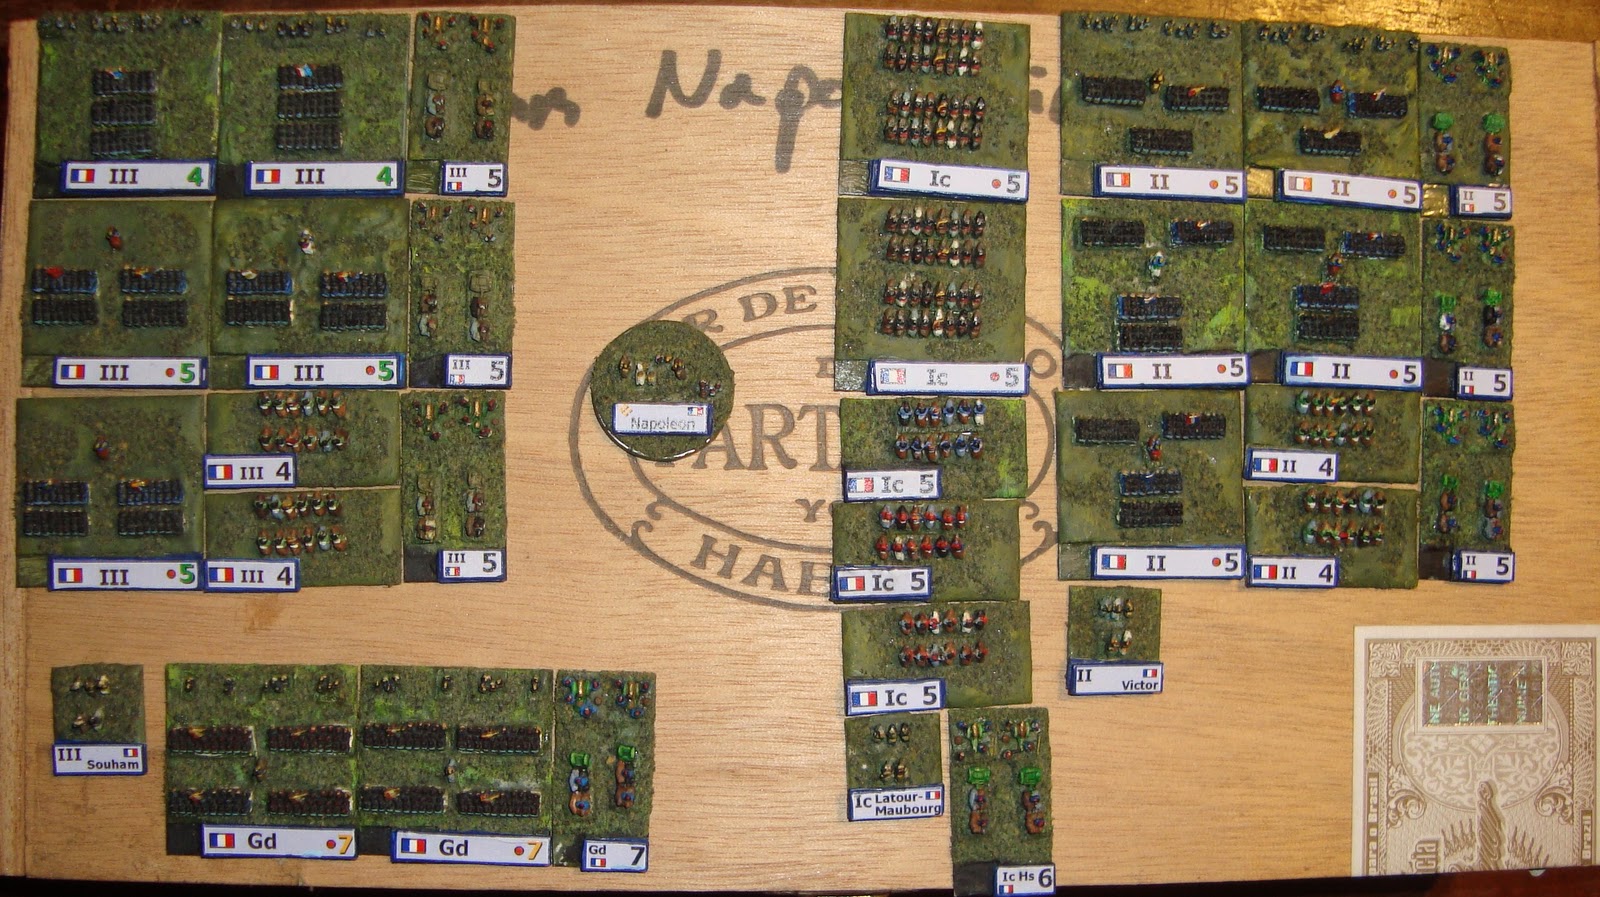
The two armies are pictured below. Note that in my V&B set-up, I don't use divisional commanders as these are faily useless , in my oppinion, and just clutter up the table. Seeing as how they are simply a marker notating a division's center of gravity and can be placed wherever a player likes, every turn, I simply point to a spot and say "the commander's here", drawing command from that point.

The French Army


II Corps, Victor
5 4-5 Infantry brigades, 1 2-5 Light Cavalry Brigade, 3 2-5 Artillery battalions
All infantry brigades have an extra skirmisher attached (so they are effectively 5-5), Basically, on legere regiment was broken down in each corp to give all the non-legere regiments a skirmisher.

III Corps, Souham3 4-5 Infantry brigades, 2 4-4 Infantry brigades, 1 2-5 Light Cavalry Brigade, 3 2-5 Artillery battalions
All infantry brigades have an extra skirmisher attached and all infantry are poorly trained. The two 4-4 brigades have no elites (they are effectively 5-4 with their attached skirmishers).

I Cavalry Corps, Latour-Mauborg
2 2-5 Dragoon Brigades, 1 3-5 Light Cavalry Brigade, 1 1-6 Horse Artillery Battery.
 
Reserve, Napoleon
2 5-7 Guards Brigades, 1 2-7 Artillery Battalion.
The Guards brigaes have inherent infantry skirmishers. Napoleon, of course, is also the army commander and a monarch (which means some special rules apply to him).


The Austrian Army


I Corps, Colloredo
8 6-4 Infantry Regiments, 1 3-4 Grenz Regiment, 1 3-5 Light Cavalry Brigade, 1 1-6 Horse Artillery battery, 1 3-6 Field Artillery Brigade.
All Infantry and Grenz Regiments have brigade guns and no elites. The Grenz regiment can break down and skirmish, but since I have no skirmish stands done for the Austrians yet, they're pretty much SOL.

II Corps, Meerveldt
8 6-4 Infantry Regiments, 1 3-4 Grenz Regiment, 1 2-5 Light Cavalry Brigade, 1 1-6 Horse Artillery battery, 1 3-6 Field Artillery Brigade.
All Infantry and Grenz Regiments have brigade guns and no elites. The Grenz regiment can break down and skirmish.

Reserve Corps, Nostitz
3 2-6 Heavy Cavalry Brigades, 1 1-6 Horse Artillery Battery, 2 3-4 Grenz Regiments, 1 2-5 Light Cavalry Brigade.
All Grenz Regiments have brigade guns and no elites.


         The battlefield, divided into set-up areas.

The French line of communications leads off of the road in the upper right corner of the map. Austrian communications lead off board from the road in the lower left corner. Note that neither player has seen the map before organizing their armies into three sections and a reserve,. They thus cannot optimize their wings according to the terrain.

The French Army is organized as follows:

Right Wing
2 4-4 brigades, 1 4-5 brigade, 2 artillery. Souham.

Left Wing
3 4-5 brigades, 2 artillery and all cavalry from II and III Corps. Victor.

Center
2 4-5 brigades, 1 artillery from III Corps. 2 4-5 brigades, 1 artillery from II Corps. 1 Light Cavalry Brigade from I Cavalry Corps. Latour-Mauborg.

Reserve
2 Guards brigades, 1 Guards artillery, 2 Dragoon brigades, 1 Horse artillery battalion. Napoleon.

The Austrian army is organized as follows:


Right Wing
4 Infantry regiments, 1 grenz regiment, 1 horse artillery, 1 light cavalry brigade from I Corps. Coloredo.

Left Wing
4 Infantry regiments, 1 grenz regiment, 1 horse artillery, 1 light cavalry brigade from I Corps.
Meerveldt.

Center
4 Infantry regiments, 1 artillery battalion from I corps; 4 Infantry regiments, 1 artillery battalion from I corps.


Reserve
The Reserve Corps. Meerveldt.